Monday, August 15, 2011

It's good to know people

A few weeks ago we received a phone call from Joe's mom, Sharon, informing us that there was this too-good-to-pass-up deal on appliances. Thanks to Joe's aunt, Cindy, who works for Lowe's in PA, and her quick thinking, we snagged a dishwasher, fridge, range, and microwave hood combo all for $500! I won't go in to all the details of how we acquired them, but it was our gain for sure! 

The old appliances- a bit dated.

The new appliances- so pretty :)
We had to wait a few weeks for them to be transported down here to MD, but in the end I think it was worth it. They look pretty nice in that small space we call a kitchen. While we were up there I also snagged this really great vintage radio.  It needs some restoration, but it really is a great piece.


Like I said, it needs some work, but I love it!


With the help of Joe's dad, Mark, who seems to be turning into our own private plumber/electrician. Joe (mostly Mark) was able to get the oven and dishwasher hooked up. We promise, Mark, there will come a day when you have shown us it all and we won't need to call you in desperate need of help :). I was not here for all the fun, I was living it up in Rehoboth, DE, with a dear friend. What I missed I was told in much detail by my exhausted husband. Replacing cords for the range and fridge were on the list. Hooking a up a dishwasher that took 2 days because the pipes just wouldn't align. 


Most of the appliances are in their place, the microwave/hood combo still needs to be hung. The fridge won't cool off so I am on a mission to get that fixed. Our fingers are crossed that it's fixable because we've been without a fridge for a week now. Also, it really is pretty. So, here's to the slow start of the kitchen makeover. 


Tuesday, August 9, 2011

It's time to play the music!

The walls are painted, the hole is patched and the details are in place. So we can dub the basement as finished! I know that Joe is really excited about this room being complete. Those of you who read this blog probably know that saying Joe is a big Muppets fan is an understatement. Joe's "Man Cave" is not donned in sports memorabilia or animal heads, or a bar even; Joe's "Man Cave" is Muppet themed. Honestly, I am happy about it :). I love my sports teams and I love beer, but having them all over our walls was not something I was down with. When Joe asked about the Muppet theme, I was on board from go! Not only have I started to love them, but the theme itself was much more appealing to me. With the help of Joe's very talented mama, Sharon, who we enlisted to create the great Statler and Waldorf painting, we finished the basement. So kudos to those of you who guessed the theme from previous posts! Enjoy, and please feel free to stop on by and check it out! Oh, but please call first :)

Waldorf and Statler heckling us from the balcony


The Muppet Movie, The Great Muppet Caper, and The Muppets Take Manhattan movie posters
Another view of Waldorf and Statler and the new Kermit trio
The new Kermit trio- all recycled calendar prints- my favorite part of the basement :)
Muppet memorabilia: The Whatnot-Joe Muppetfied 

Sunday, August 7, 2011

Ding dong the hole is gone!

The horrible, dreadful, bothersome hole is finally gone. It only took 24 hours to cover, and I am in love with the results! This was one of the easiest projects we have done so far. The first thing we had to do was prep the hole. I cut around the perimeter of the drywall to expose the studs so we would have something to drill into. After that, it was a cakewalk. We ventured to Lowe's for a giant piece of drywall, brought it home, measured and cut it and that was that.


Before-How it looked when we bought the house
After the new drywall was cut to size, we used a drill to secure it in place. Then we added joint tape around the edges to seal them, applied a little putty and waited for it to dry so we could sand and paint. The hardest part was waiting for it to dry because I am impatient and want things done immediately. We let the putty dry overnight, and I sanded it this morning and painted. I am so pleased with the results. Now the basement looks like a place to relax instead of a work-in-progress. If anyone needs any holes patched, I am your girl!
Before-Waiting to be patched-a true eyesore


Prepped and ready to be covered


Already looking better


Patching things up


Waiting to be sanded and painted!


The hole is gone, gone, gone!!


After-room put back together- no more eyesore behind the TV :) 


Tuesday, August 2, 2011

Finishing Touches

Well, we finally added the shelf and some art work in the bathroom to really complete that project. This adds that visual interest I was talking about in a previous post. It's good to give the eyes something to look at in a small space, it gives them more to focus on than how small it is.

Target has these great flat wood shelves that come in a variety of sizes. The simplicity of them helps enhance the space without seeming too fussy. In small spaces clean lines are your best bet. Fancy scrolls and crown molding can really overwhelm the look you are going for. I picked up some cheap canvas prints from Bed Bath and Beyond, I love that place, and thanks to a house warming gift card they were free to me :). The orange print helps to break up the color scheme while complementing the palate.


Our goal for the weekend is to finish the basement, i.e. patch that dreadful hole. The next phase in that project will be those small details. Small details can always come along as you are working on other projects :). The next big redo will be the kitchen, let's hope there's still room in the budget! 

"Always Make New Mistakes"

For my 21st birthday, one of my best friends gave me a magnet that had a quote by Esther Dyson saying "Always make new mistakes." Since then, that magnet has called my refrigerator home. I always put it in a place that is in eye sight as a constant reminder that mistakes are to be made. It was the perfect motto for us as we celebrated turning 21, and it was a perfect motto for this current project.

Before- The boldness of the burgundy on the tan really draws attention to the low ceiling. 

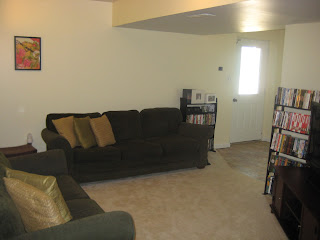
After- Adding a lighter cream color to all walls gives a better flow to the room by blending the walls and the low ceiling. 


This basement paint job was one mistake after the other. We ran into problem after problem. None of them were too serious, well there was a shattered window involved, but we'll get there, but mistakes none the less. For starters, we haven't patched the horrible hole in the wall. This is going to be a simple fix, but it turns out there are two different widths of drywall. I mean, come on, builders, is 3/8" that much different than 1/2"! Not knowing the width of our drywall delayed us in purchasing what we needed. Since we had the paint ready to go, I caved and we started painting. Joe was able to help this time. I'm still debating if I can call it help, just kidding, I love you, babe!!


We chose two colors to paint the walls with. As I said in an earlier post, the walls were a deep burgundy and tan alternating walls. It was way too dramatic for the space. We lightened things up down there with Gold Coast White and Fresh Guacamole, I have to say I honestly picked the second color mostly because of its name. I love guacamole! We chose again to have one accent wall with the Fresh Guacamole and the remaining walls Gold Coast White. I'm really loving the pop of color the accent wall gives you. It's not as overwhelming as a whole room of color.

Before~Notice hole in wall. It drives me crazy on a daily basis!

Ahh Relaxing....please continue to ignore hole!
On to the problems. To start with, we didn't have enough paint.We knew going in that the burgundy would be difficult to cover, but we didn't expect the walls to soak up the paint the way it did on both colors. Mistake one. We had a sheet down covering the floor by the basement door. It turns out that sheets are no good for painting. Paint bled through the sheet onto the floor. Luckily, there is a genius out there that invented GooGone and the paint came right up. To add to the paint spillage: the beast, Sweetums, thought it would be cute to knock over paint onto our brand new carpet. Keys to getting paint out of carpet, dab up as much as you can, don't let it dry, and if you have a Green Machine be thankful.

Before-Room appears choppy- sharp angles and a deep color really plays up the smallness of the space. 


After- Brighter colors let light in to open up the room- Sweetums enjoying the new paint job!
The biggest mistake/problem of the whole project was the shattered window. I'll start at the beginning, our basement door has a lite, pane of glass, in it. Around the glass is a grid and frame. I was thinking it would be much easier to remove the grid to spray paint it instead of having to tape the glass, which is just a pain. So I started unscrewing. I got the last screw out, pulled the grid toward me and watched the whole window fall to the concrete and shatter into a zillion pieces. Some choice words were said let me tell you. To defend my choice, as I was unscrewing the window, it was not coming loose so I was thinking that the outside was secure. I mean, come on, if you are going to design something that is a pain to update at least make it so the consumer can easily make the updates. After the glass was cleaned up and the smart mouthed 16 year old gave me directions through Lowe's to the door section, to which, I replied thanks, so I look for all the doors right?? I made my way to Lowe's to find out that they don't sell the replacement window, only the whole door.

Notice the grids from the lite shinning on the wall?

And now they're gone, whoops :) Live and learn! 
On to location two, Frederick Glass. Here I met some serious characters, which really helped my mood to this point. They were so much help! They helped me decide a new door would be the best option due to availability and price, and showed me how to measure for the correct size. Home I went to measure a door, only to be told by my friendly neighbor that our door frame is not standard, so back to Frederick Glass I went  to order the new window and brainstorm what to use to cover the giant hole. Well my luck struck and they had the replacement glass in stock, so I was ready to go. It took my mom and I about five minuets to install. I have to say, it looks so good. It doesn't have the grids anymore which really lets in light better, and opens the room up.

We'll be patching that hole in the wall within the next couple of weeks and hopefully mounting the TV and adding some new pillows. There will also be some fun artwork added to the walls. Can't wait! Enjoy the pics!

Joe's awesome idea to frame a calendar print. REDUCE, REUSE, RECYCLE! 
Who can guess the "theme"???