 |
| Feeling nostalgic :) |
Sunday, December 18, 2011
Let us Entertain you!
Friday, December 16, 2011
It's beginning to look a lot like Christmas!
It seems like months since my last post, oh because it has been. Well, friends, we're back. I've missed blogging dearly, and as my lovely husband pointed out I don't need to just blog about renovations to the house. Speaking of, things are at a bit of a standstill right now. School began, the holidays snuck up on us, and the budget ran out. So, while we are replenishing the budget for summer work, and preparing for the holidays, you'll have to deal with boring posts about our lives :).
Christmas seemed like a great time to start blogging again. I mean, who doesn't love Christmas?? As we do almost every year, my mom and I trekked out the day after Thanksgiving to acquire our trees. Thanks to the very lovely selection at Gaver Tree Farm, we have made that our go to place. Joining us this year was my brother, Danny. We have been known to hack down our own tree, but this year we decided to go with a pre-cut tree. I mean why waste the energy if someone is going to do it for you? As usual, Gaver's did not disappoint. Two very nice Douglas Firs were chosen and loaded up and brought home.
In this tiny 942sqft space a 6ft plus tree might seem to overwhelm the space, but when it comes to Christmas trees I say the bigger the better. Surprisingly, the tree looks very at home in front of the picture window we have upstairs. Joe and I spent the Sunday after Thanksgiving decorating the tree, along with some help from the pups. A new addition this year and one that will be every year is the awesome stockings Joe's mom made for us. As you are all aware, Joe is a huge Muppet fan. I have to say he has sucked me in to his obsession and I am starting to love them, too. Who seriously doesn't have a special place in their heart for Kermit The Frog?


 Well I hope you weren't too bored with this post. Enjoy the pics!
Christmas seemed like a great time to start blogging again. I mean, who doesn't love Christmas?? As we do almost every year, my mom and I trekked out the day after Thanksgiving to acquire our trees. Thanks to the very lovely selection at Gaver Tree Farm, we have made that our go to place. Joining us this year was my brother, Danny. We have been known to hack down our own tree, but this year we decided to go with a pre-cut tree. I mean why waste the energy if someone is going to do it for you? As usual, Gaver's did not disappoint. Two very nice Douglas Firs were chosen and loaded up and brought home.
In this tiny 942sqft space a 6ft plus tree might seem to overwhelm the space, but when it comes to Christmas trees I say the bigger the better. Surprisingly, the tree looks very at home in front of the picture window we have upstairs. Joe and I spent the Sunday after Thanksgiving decorating the tree, along with some help from the pups. A new addition this year and one that will be every year is the awesome stockings Joe's mom made for us. As you are all aware, Joe is a huge Muppet fan. I have to say he has sucked me in to his obsession and I am starting to love them, too. Who seriously doesn't have a special place in their heart for Kermit The Frog?


Sunday, September 11, 2011
New Project
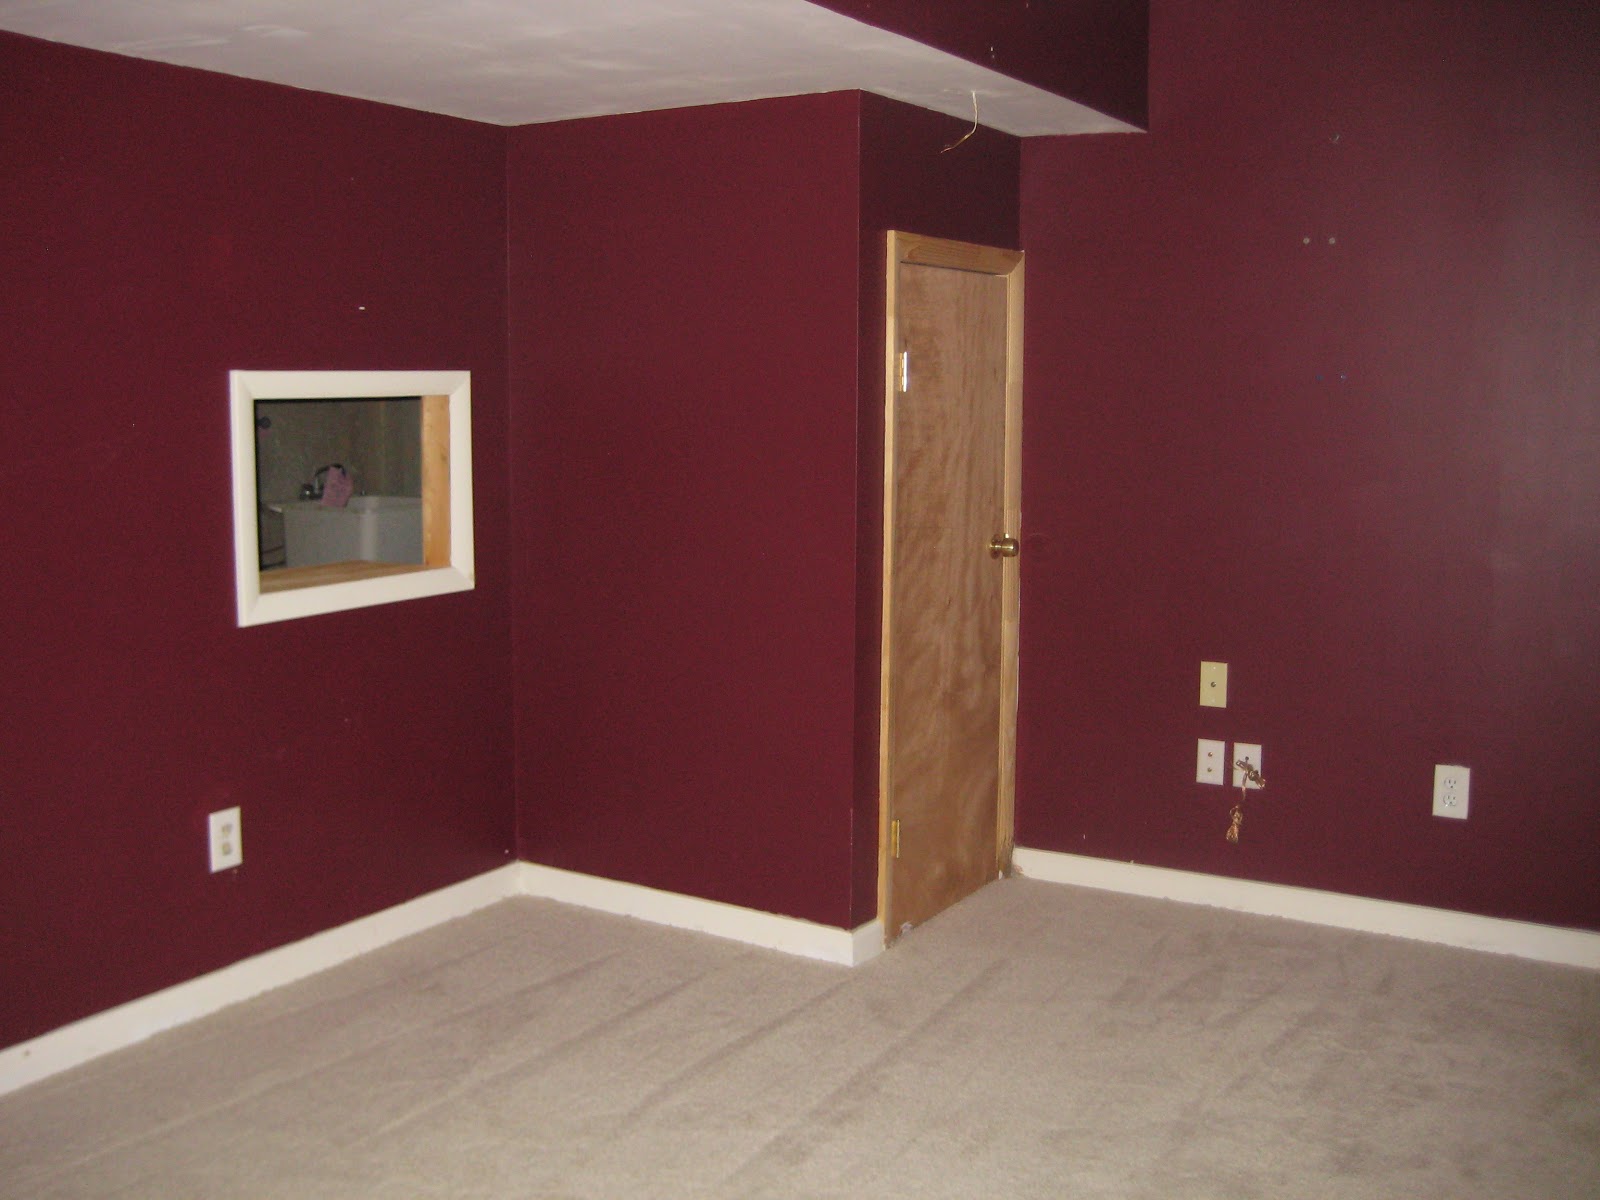
Since we have been expecting the kitchen to be the next project, I was surprised to find myself planning for our bedroom. Since it's all I think about house-wise, this will be our next adventure. Not only will the bedroom be budget friendly, but it will be nice to have the room that is meant for relaxation feel relaxing.
There will not be much renovation in the bedroom, but I think the small details will have a big impact. Right now the walls are a neutral tan and our bedspread is gray with yellow. These two color schemes don't really mesh. To add to the mismatch we have an old nightstand, a bed without a headboard, brown cloth-like blinds and a new tv and stand. Everything in the room is just thrown together and it shows. I would like to bring harmony to the room by adding a design that flows throughout the room.
In order to make this happen, we will be painting the walls gray, freshening up the ceiling, adding newer, brighter blinds, and some artistic details behind the bed. I don't like big over-sized beds or headboards, so we will be framing out a space behind the bed to give the look of a headboard. To draw in the design on the bed spread, we will either paint or look for wallpaper to fill the frame. We'll be putting in a night stand for each side of the bed as well. To maximize room, we are opting for floating nightstands which gives more floor space. This really helps to open up a small space.
Another aspect that makes the room lack harmony is a portable dog kennel. We love our pets to death, but the kennel has got to go. Meaning Poe is going to have to learn to sleep on a dog bed. He sleeps in the kennel because he likes to snuggle with us at night. I am not a fan of this at all. So, like new parents weaning their baby to sleep through the night, we will be weaning Poe to sleep on a dog bed. We'll check back later and let you know how it goes :).
Below are some before pics. I am hoping to get the ball rolling on this project over the next few weeks. Since it's mostly painting it should be done in a weekend or two. Any suggestions are welcomed :).
 |
| View as you enter the room. Notice the blinds. Not terrible, but they just don't go. |
 |
| Dog kennel on the left will be leaving. The nightstand will be leaving as well, and floating nightstands put in their place. |
 |
| New TV and stand. I found a writing desk and turned it into our entertainment stand. It gave us the height we needed to enjoy TV from the bed. The cords will also be dealt with as we make changes :). |
Sunday, September 4, 2011
If you can't stand the heat...
So, it's been quite some time since our last post. Summer is over and school is in session, and our free time is gone. It's working 7 a.m.-7 p.m., squeezing in dinner, and trying to spend some time together before we collapse into bed each night, that takes up our time right now. Even with our busy schedules back, we have had some time to make some small changes. We were able to hook up the microwave and get the kitchen back in working order.
We are so pleased with the microwave above the stove. I never thought it would be so awesome, but it truly is. It gave us so much more counter top space, that we decided to keep one section of counter and cabinet we were thinking of taking out. As far as the rest of the kitchen goes, we are still researching cabinet restorations and flooring. I'm pretty set with the floor, now it's just a matter of finding the time to lay it. Hopefully, as the school year continues and I get settled, we will have that floor laid in no time!
Here's some pics of the microwave and the lovely new appliances. Hopefully, we'll be back soon!!!
 |
| The beautiful microwave and oven :) |
 |
| Appliances are in, now we need to make the rest of the kitchen as pretty! |
Monday, August 15, 2011
It's good to know people
A few weeks ago we received a phone call from Joe's mom, Sharon, informing us that there was this too-good-to-pass-up deal on appliances. Thanks to Joe's aunt, Cindy, who works for Lowe's in PA, and her quick thinking, we snagged a dishwasher, fridge, range, and microwave hood combo all for $500! I won't go in to all the details of how we acquired them, but it was our gain for sure!
 |
| The old appliances- a bit dated. |
 |
| The new appliances- so pretty :) |
We had to wait a few weeks for them to be transported down here to MD, but in the end I think it was worth it. They look pretty nice in that small space we call a kitchen. While we were up there I also snagged this really great vintage radio. It needs some restoration, but it really is a great piece.

 |
| Like I said, it needs some work, but I love it! |
With the help of Joe's dad, Mark, who seems to be turning into our own private plumber/electrician. Joe (mostly Mark) was able to get the oven and dishwasher hooked up. We promise, Mark, there will come a day when you have shown us it all and we won't need to call you in desperate need of help :). I was not here for all the fun, I was living it up in Rehoboth, DE, with a dear friend. What I missed I was told in much detail by my exhausted husband. Replacing cords for the range and fridge were on the list. Hooking a up a dishwasher that took 2 days because the pipes just wouldn't align.
Most of the appliances are in their place, the microwave/hood combo still needs to be hung. The fridge won't cool off so I am on a mission to get that fixed. Our fingers are crossed that it's fixable because we've been without a fridge for a week now. Also, it really is pretty. So, here's to the slow start of the kitchen makeover.
Tuesday, August 9, 2011
It's time to play the music!
 |
| Waldorf and Statler heckling us from the balcony |
 |
| The Muppet Movie, The Great Muppet Caper, and The Muppets Take Manhattan movie posters |
 |
| Another view of Waldorf and Statler and the new Kermit trio |
 |
| The new Kermit trio- all recycled calendar prints- my favorite part of the basement :) |
 |
| Muppet memorabilia: The Whatnot-Joe Muppetfied |
Sunday, August 7, 2011
Ding dong the hole is gone!
 |
| Before-How it looked when we bought the house |
 |
| Before-Waiting to be patched-a true eyesore |
 |
Prepped and ready to be covered     |
Tuesday, August 2, 2011
Finishing Touches
Well, we finally added the shelf and some art work in the bathroom to really complete that project. This adds that visual interest I was talking about in a previous post. It's good to give the eyes something to look at in a small space, it gives them more to focus on than how small it is.


Our goal for the weekend is to finish the basement, i.e. patch that dreadful hole. The next phase in that project will be those small details. Small details can always come along as you are working on other projects :). The next big redo will be the kitchen, let's hope there's still room in the budget!
"Always Make New Mistakes"
For my 21st birthday, one of my best friends gave me a magnet that had a quote by Esther Dyson saying "Always make new mistakes." Since then, that magnet has called my refrigerator home. I always put it in a place that is in eye sight as a constant reminder that mistakes are to be made. It was the perfect motto for us as we celebrated turning 21, and it was a perfect motto for this current project.
This basement paint job was one mistake after the other. We ran into problem after problem. None of them were too serious, well there was a shattered window involved, but we'll get there, but mistakes none the less. For starters, we haven't patched the horrible hole in the wall. This is going to be a simple fix, but it turns out there are two different widths of drywall. I mean, come on, builders, is 3/8" that much different than 1/2"! Not knowing the width of our drywall delayed us in purchasing what we needed. Since we had the paint ready to go, I caved and we started painting. Joe was able to help this time. I'm still debating if I can call it help, just kidding, I love you, babe!!
The biggest mistake/problem of the whole project was the shattered window. I'll start at the beginning, our basement door has a lite, pane of glass, in it. Around the glass is a grid and frame. I was thinking it would be much easier to remove the grid to spray paint it instead of having to tape the glass, which is just a pain. So I started unscrewing. I got the last screw out, pulled the grid toward me and watched the whole window fall to the concrete and shatter into a zillion pieces. Some choice words were said let me tell you. To defend my choice, as I was unscrewing the window, it was not coming loose so I was thinking that the outside was secure. I mean, come on, if you are going to design something that is a pain to update at least make it so the consumer can easily make the updates. After the glass was cleaned up and the smart mouthed 16 year old gave me directions through Lowe's to the door section, to which, I replied thanks, so I look for all the doors right?? I made my way to Lowe's to find out that they don't sell the replacement window, only the whole door.
 |
Before- The boldness of the burgundy on the tan really draws attention to the low ceiling.
|
 |
| After- Adding a lighter cream color to all walls gives a better flow to the room by blending the walls and the low ceiling. |
We chose two colors to paint the walls with. As I said in an earlier post, the walls were a deep burgundy and tan alternating walls. It was way too dramatic for the space. We lightened things up down there with Gold Coast White and Fresh Guacamole, I have to say I honestly picked the second color mostly because of its name. I love guacamole! We chose again to have one accent wall with the Fresh Guacamole and the remaining walls Gold Coast White. I'm really loving the pop of color the accent wall gives you. It's not as overwhelming as a whole room of color.
 |
Before~Notice hole in wall. It drives me crazy on a daily basis!
|
 |
| Ahh Relaxing....please continue to ignore hole! |
On to the problems. To start with, we didn't have enough paint.We knew going in that the burgundy would be difficult to cover, but we didn't expect the walls to soak up the paint the way it did on both colors. Mistake one. We had a sheet down covering the floor by the basement door. It turns out that sheets are no good for painting. Paint bled through the sheet onto the floor. Luckily, there is a genius out there that invented GooGone and the paint came right up. To add to the paint spillage: the beast, Sweetums, thought it would be cute to knock over paint onto our brand new carpet. Keys to getting paint out of carpet, dab up as much as you can, don't let it dry, and if you have a Green Machine be thankful.
 |
Before-Room appears choppy- sharp angles and a deep color really plays up the smallness of the space.
|
 |
After- Brighter colors let light in to open up the room- Sweetums enjoying the new paint job!
|
 |
| Notice the grids from the lite shinning on the wall? |
 |
| And now they're gone, whoops :) Live and learn! |
On to location two, Frederick Glass. Here I met some serious characters, which really helped my mood to this point. They were so much help! They helped me decide a new door would be the best option due to availability and price, and showed me how to measure for the correct size. Home I went to measure a door, only to be told by my friendly neighbor that our door frame is not standard, so back to Frederick Glass I went to order the new window and brainstorm what to use to cover the giant hole. Well my luck struck and they had the replacement glass in stock, so I was ready to go. It took my mom and I about five minuets to install. I have to say, it looks so good. It doesn't have the grids anymore which really lets in light better, and opens the room up.
We'll be patching that hole in the wall within the next couple of weeks and hopefully mounting the TV and adding some new pillows. There will also be some fun artwork added to the walls. Can't wait! Enjoy the pics!
 |
| Joe's awesome idea to frame a calendar print. REDUCE, REUSE, RECYCLE! |
 |
| Who can guess the "theme"??? |
Tuesday, July 19, 2011
Moving Right Along
With the bathroom finished, all we have been thinking about is our next project - the basement. Life kicked in and time has been lost. A mini vacay to Va. Beach was taken, baby showers and bridal showers galore have taken over, and visits from family have been had. Things are on their way to calming down, but summer's end is approaching fast and so is my free time!
We have one small hang up in the basement that is also taking away from starting - a hole. The previous owners seemed to have a 20 gal fish tank in the wall. Before we can start painting, I want the hole taken care of. My philosophy is, if you don't fix it first it won't get done. It shouldn't be too hard to fix: measure, get some dry wall, drill, putty and tape, but like most things I am sure it will be easier said than done.
We will be measuring the annoying hole this week and gathering materials for the patch. After that, it's on to painting. That's really all we're doing in the basement is paint. It's almost a disappointment since the bathroom was such an overhaul!
We are pretty sure that the paint will make a very dramatic statement down there. Right now the walls have been painted a deep burgundy color with a contrasting tan. The colors are not hideous, but they are not conducive to the environment down there. There is very little natural light in the basement. There is a door leading to the side yard, but it does not let in a lot of light. As far as unnatural lighting goes, there is a small dome light on the ceiling that is a sad excuse for a light. To ease this we have added a floor lamp which helps brighten the space.
Along with paint, we'll be adding a new light fixture and more floor lamps. With smaller spaces it's best to light those corners. Bright corners give the appearance of a larger space. Dark, unlit corners make the space seem much smaller than it is. We will be brightening up the room with lighter paints and adding an accent wall. There will also be some fun details, with the help of Sharon, Joe's mom.
We've got the motivation for this project to begin, now I just need to find the time!
Saturday, July 9, 2011
~Finito~
In preparation for the new floor, I decided to tear up the old floor. This turned out to be a bear of a project! I think I stated in my last post, this step will definitely be skipped when we redo the kitchen floor. The reason for taking up the old floor was there was some water damage behind the toilet. I started pulling and from there I couldn't look back. My mom called at just the right moment and I enlisted her to help! In the end it was better that we took up the old bathroom floor because of the damage. This helped the new floor lay much nicer.
 |
| Getting rid of that yucky old vinyl... |
 |
| Ready for the new floor! |
As I said earlier, it took seven hours to lay the new floor in the bathroom. This is about three hours longer than I thought it would take. It's only 27sqft! Again, I was saved by mom. She came over unannounced at the moment of truth- when I actually had to start cutting the tile to fit around hard objects. With her guidance and smarts, I was able to cut and lay the tile around the toilet, vanity and door frame - three very tight spots. When the floor was all laid, I was quite pleased with the results.
 |
| In the beginning... |
 |
| So close, most of those tight space taken care of! |
I was very anxious to get the grout down once the floor was laid. We had to let the new tile sit over night to let the adhesive cure, see we're learning the language ;-). The total time to add the grout took 25 minutes. This was more shocking than how long it took to lay the tile! I want to give a shout out to whomever came up with pre-mixed grout. Thank you for your smarts! My parents had ceramic tile laid throughout their kitchen, mixing the grout, as I remember was time consuming to get the right consistency. All I needed was a 2" plastic putty knife and a sponge. Unlike ceramic tile where you apply the grout over most of the tile, you need to be careful to avoid this with vinyl tile. I only applied the grout to the seams and wiped up any excess with a damp sponge. This was the one time, so far, the 1,2,3 steps held true!
 |
| Done, without the grout and 1/8" spacers still left ... |
 |
| Grouted and ready to go! |
I have to say I am so excited to be done with this project. There are a few minor details left, like some shelving, but nothing that will prevent us from moving on to the next room. So we are dubbing this project as finito!
 |
| Before... |
 |
| After....FINITO! |
Tuesday, July 5, 2011
Almost There!
The bathroom is almost complete! We spent the better part of this weekend taking out and tearing down an old, rusty, moldy, stuck on sink, toilet and medicine cabinet. We put in the new toilet, vanity sink combo, hung the new mirror, and new light fixture. None of this could have been done without the help of Joe's dad, Mark. I should almost take out the use of "we" and say Mark did all this. Mostly Joe and I were there as spectators along with Joe's mom, Sharon. Let me just say we are sooooo appreciative of him coming over and wasting two days to complete all this work! It looks fantastic, or so we think!
 |
| Before: wood topped toilet seat and bulky oak vanity made for poor flow in the room |
 |
| After: smaller white vanity and toilet help open up the space. The white really helps light bounce off creating a more open look.
We started with the toilet which wasn't too awful to remove, but it wasn't easy either. The floor screws were rusty and some trouble to remove. Taking out a toilet is not as easy as one would think. I won't go in to all the boring details, but let me say what I thought was easy as 1,2,3 turned out to be as easy as 1,2,3............25! After the toilet it was on to the vanity!
|
This was another project that seemed so simple. I read a lot about removing toilets and vanities on the internet and everything just looked so simple. Nothing over 5 steps. Rule #2 of small, or any home, improvement, don't believe what you read on the internet. The old vanity had four walls, one on each side. The back wall was the hardest to remove. It had holes cut for the pipes and the rest was solid. This was a bit of a problem, tight spaces don't make it easy to do demolition. It did get completed, and I think the sweat was definitely worth it. Although I'll have to ask Mark if he thinks so!
We decided to reuse the old faucet on the new sink. There really was nothing wrong with it and the style went with the rest of the decor. Doing this helped us save around $50 for a new one. When you're working on a tight budget it's always smart to reuse. Not only is it more friendly for our environment, it's more friendly for your wallet as well!
 |
| Before: Small medicine cabinet with vanity lights. Not a lot of reflective surface with this small mirror. This makes the space appear even smaller than it is. Vanity lights are dated and don't provide adequate light. |
 |
| After: Hanging the mirror horizontal provides more reflective surface to help the room appear larger. Mirrors can be your best friend in a small space! The new light fixture provides more light and flows with the shape of the mirror. |
All of this took place on day one. On day two, we took down that horrible medicine cabinet, hung the mirror, and installed the new light. Again, most of this was completed by Mark. A bonus to DIY projects is having someone who actually knows what they are doing! Even though Mark was the one doing most of the work, he really was a good teacher. I know I learned a lot and I sure hope Joe did, too. I think the next bathroom install will be something Joe and I could handle on our own, with Mark on call of course.
The last item on the bathroom list is the floor. I tore up that old linoleum in preparation for the new tile. Tearing up 19 year old linoleum is not so fun. This step will be skipped when it comes time to do the kitchen. Once the floor is done the bathroom will be completed! I cannot wait for this project to be finished so we can move on the next one.
Enjoy these next photos. Next time you see this bathroom it will be complete!
Subscribe to:
Posts (Atom)